3DP Vise
Summary
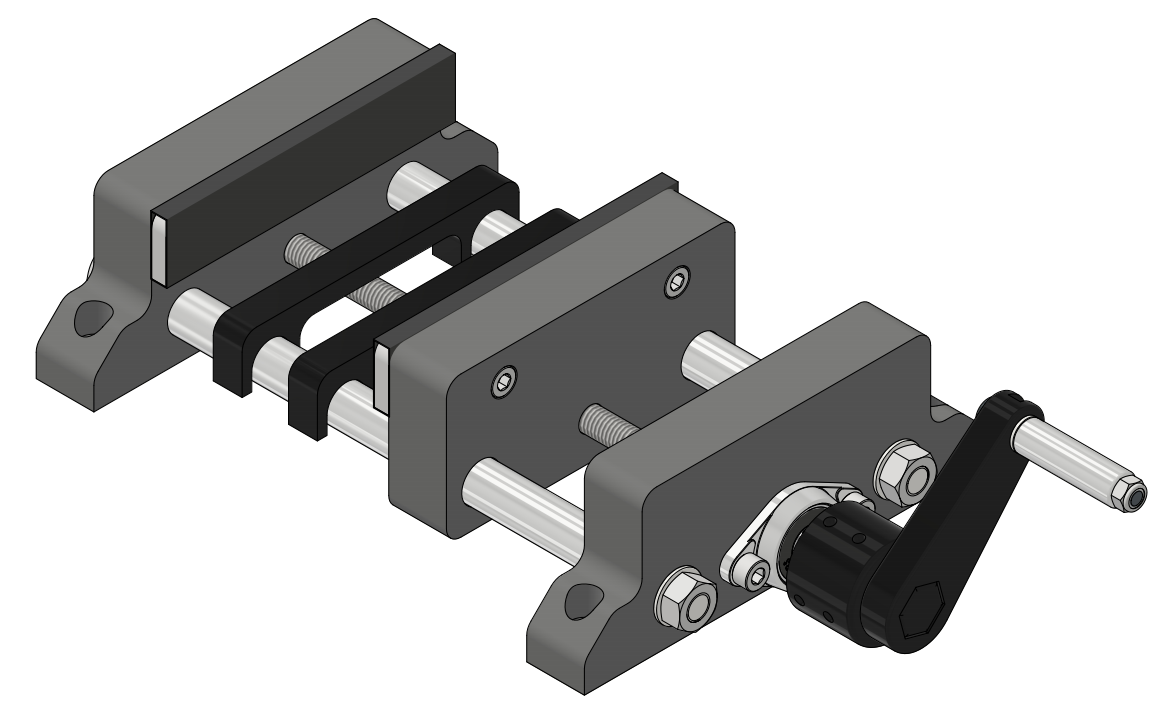
It is a small vise.

Features
- Cheap
- 115 mm opening
- Removable handle
- Fixed size, not affected by the movement of the jaw
- Rubber surface jaw
How to build it
Parts
All the parts are HERE.
Commercial parts
| ITEM | QTY |
|---|---|
| M8 threaded rod | 1 m (just to be sure) |
| 12.8 mm OD Aluminium tube | 1 m (just to be sure) |
| M8 washer | 4 |
| M8 Nut | 5 |
| KFL08 bearing | 1 |
| M5x50 bolt | 1 |
| M5x20 parker bolts | 6 |
| M5 nut | 5 |
| M5 low profile nut | 4 |
| M5 locking nut | 1 |
| M5 washer | 2 |
| 33 mm aluminium spacer | 1 |
| M3x6 set screw | 2 |
| M3 nut | 2 |
| Bike tube 700x18/23C | 1 |
NOTES:
- You can print the spacer (i put one in the .stls folder), i dont know where i got aluminium one that i used.
- If you cannot find low profile nuts, you can print the rubber plate2, which uses standard M5 nuts, but you will probably need a bigger bike tube.
- You can also replace the set screws with M3 not too long bolts.
Printed parts
| ITEM | Cantidad |
|---|---|
| Stationary Jaw | 1 |
| Stationary Jaw2 | 1 |
| Mobile Jaw | 1 |
| Rubber plate | 2 |
| End-nut | 1 |
| Crank | 1 |
Print them sturdy and with low res.
Tools
| ITEM |
|---|
| Scissors or cutter |
| 1 mm allen wrench |
| 4 mm allen wrench |
| Wrench (2) |
| Metal saw |
Assembly guide

Preparing parts
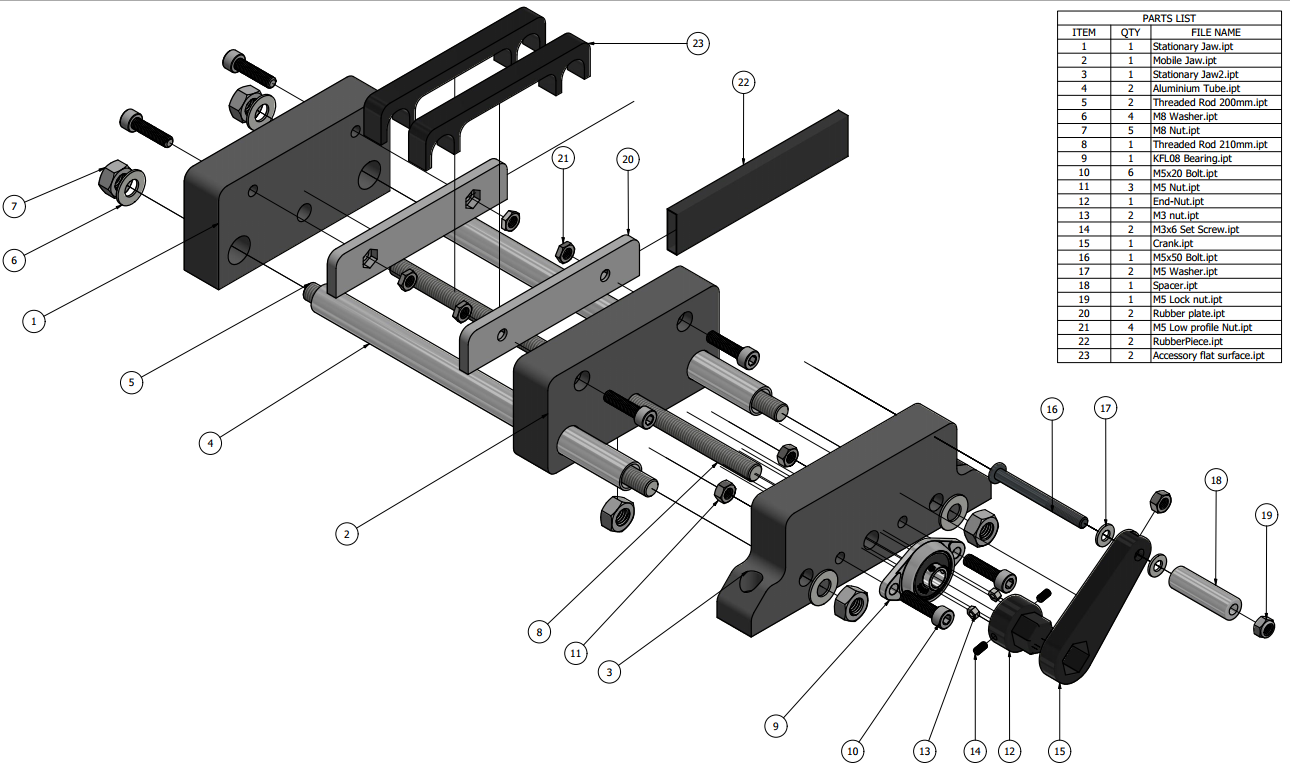
- You need 3 pieces of M8 threaded rod to fit as the model implies, approximately, two 200 mm bars and one 210 mm bar, but it can be whatever you want while it matches with the aluminium tubes, which are 180 mm by default. You can cut these pieces with a saw and a…
…vise. wink wink
- Cut two 100 mm long pieces of the rubber tube, using a cutter or scissors. Make two holes that match with the rubber plate holes(20) using pliers in one of the sides of the rubber pieces, so the M5 bolts can pass through them.
Step by step
- Pass the aluminium bars(4) through the holes in the mobile jaw(2) and fit the ends in the stationary jaws(1)(3).
- Pass the threaded rods(5) through the aluminium tubes. Put a M8 washer(6) and nut(7) in each of the ends and squeeze with the wrenchs (not too much).
- Put a M8 nut inside the mobile jaw, by the bottom hole.
- Pass the threaded rod(8) through the central hole in the jaws and the M8 nut. The end must be barely touching the stationary jaw(1).
- Put the bearing(9) in the threaded rod, bolt it with m5x20 bolts(10) and M5 nuts(11) using the 4 mm allen wrench, which are placed in the other face of the stationary jaw(3)
- Pass two M3 nuts(13) through the holes in the end nut(12), and the M3x6 set screws(14) through them.
- Put the end-nut in the free end of the threaded rod and tighten the set screws with the 1 mm allen wrench.
- Get the crank(15) and put a M5 nut in the smaller end.
- Pass the M5x50 flat head bolt(16) through the nut, with M5 washers(17) in both sides.
- Put the spacer and the lock nut in the bolt. The spacer must spin freely.
- Put the M5 low profile nuts(21) in the holes of the rubber plates(22).
- Wrap the rubber plates with the rubber pieces, the holes must match.
Bolt the rubber plates in the stationary jaw(1) and the mobile jaw(2) using M5x20 bolts and the 4 mm allen wrench.
- READY!
Then you can bolt the vise using the holes in the stationary jaw(3), and start using it putting the crank in the end nut.
The accesory flat surface is not mandatory, you can use it as a base to support pieces.
Future work
- A more comfortable handle, to fit the whole hand.
- Assembly guide with images.
License
This work is published under the license Creative Commons Attribution 4.0 International License.


