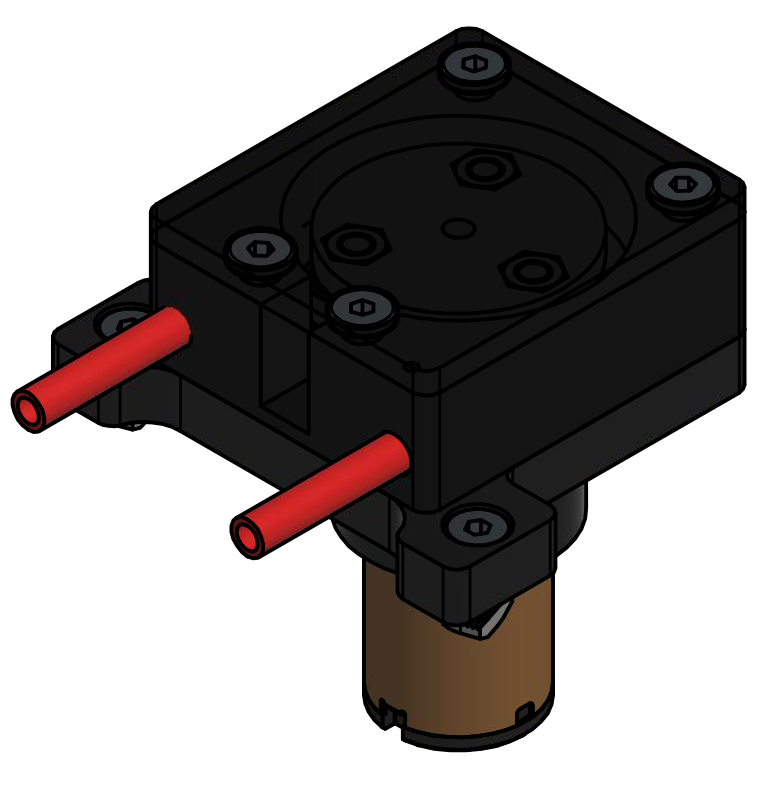
Persitaltic pump DC
Summary
My take on making a small peristaltic pump, using 3d printed parts and a DC motor. It has been tested successfully with glycerine, and controlled in an open and closed loop system, which are included in THIS repository.

Features
- Flow ? cc/s.
- 6 mm silicone hose.
- 12 V DC gearbox motor.
How to build it
Parts
The parts are HERE
Commercial parts
| ITEM | Quantity |
|---|---|
| Motor DC 12V 60RPM | 1 |
| Flat head bolt M5x30 | 4 |
| Flat head bolt M5x15 | 3 |
| Low profile M5 nut | 3 |
| M5 nut | 4 |
| Bearing 605ZZ | 6 |
| M3x8 countersink bolt | 2 |
| M3 nut | 3 |
| Set screw M3x6 | 3 |
| Silicone hose 6 mm ED | 30 cm min. |
| Washer M4 | 1 |
Printed parts
| ITEM | Cantidad |
|---|---|
| Tapa superior | 1 |
| Tapa inferior | 1 |
| Caja bomba | 1 |
| Impulsor | 1 |
Tools
| ITEM |
|---|
| Scissor |
| Allen wrench 4 mm |
| Allen wrench 3 mm |
| Allen wrench 2 mm |
| Allen wrench 1.5 mm |
Asssembly guide
Step by step
- Press fit the M5 low profile nuts in the bottom of the Impulsor.
- Bolt a pair of bearings in each nut with the M5x15 bolts.
- Press M3 nuts in the cavities of the Impulsor.
- Put the set screws in the nuts, without passing to the center hole of the piece.
- Bolt the motor to the Tapa Inferior with the countersink bolts.
- Put a M4 washer in the motor axis.
- Pass the hose through the smaller hole of the CajaBomba first, and then out of the CajaBomba by the bigger hole.
- Put the Caja Bomba on top of the Tapa inferior.
- Put the impulsor in the axis, turning it to acommodate ith the hose.
- Tighten the set screws with the smaller allen wrench through the cavity in the hose side of the pump.
- Press some M5 nuts in the Tapa inferior.
- Bolt the TapaSuperior on top of the CajaBomba.
Electronics
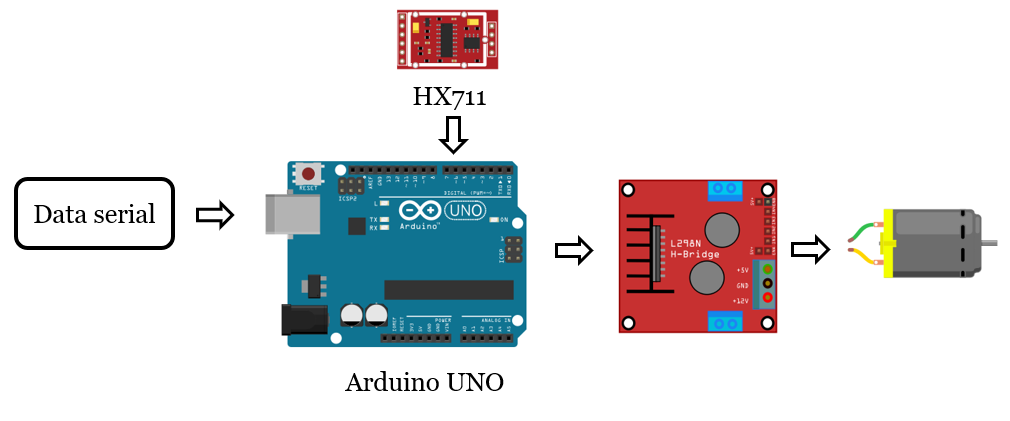
The usual way of using a DC motor is with an H-bridge and a controller like Arduino., as the figure below shows:

Control
The system can be operated in a open or closed loop.
Open loop
For an open loop control you need the previous circuit and do some tests that relates the input of the motor with the flow, and then build a regression and/or use some timer.
Closed loop
For a more precise operation it is possible to use a load cell to get feedback about the dispensed mass, as the next diagram shows:

To use the load cell, it is necessary to download the HX711 library for Arudino. The included sketch uses a 1kg load cell and a proportional controller. It requires the input of desired ml and translates it to mass (gr) using the specific volume of the substance.
Components
| ITEM | Quantity |
|---|---|
| Arduino UNO | 1 |
| H-Bridge L298N | 1 |
| Load Cell 1 kg | 1 |
| Amplifier HX711 | 1 |
- wires.
Future work
- To diminish the pulsation
License
This work is published under the license Creative Commons Attribution 4.0 International License.

